Setting up your home studio part 3: Getting it all together
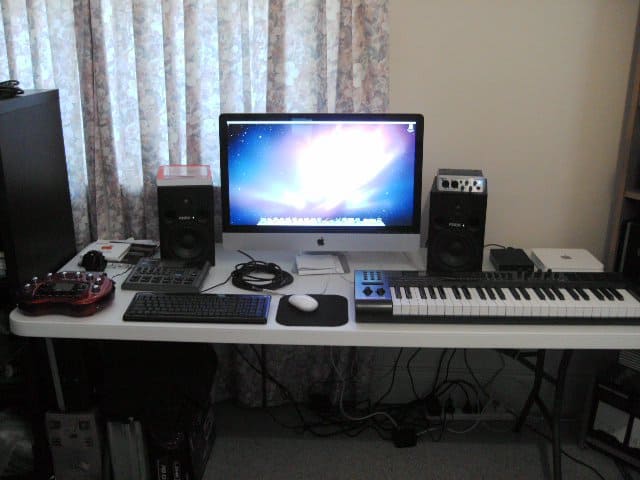
Before you read on. Please know that this is the most basic of basic. If you’ve already set up your studio, you are past this level. This is for folks who have just started and literally don’t know where to begin. You can read part 1 and part 2 if you are still stuck wondering what all you need to get started. Setting Up This is tough. You have to find a spot in your room that works. Normally, you will want some kind of balance. You want the left and right speakers to sit an even distance from the left and right side of the room. This is obviously difficult in most cases, and you will need to work with what you have. I have linked a few resources that always helped me along the way:
Sound on Sound Home Studio setup – Great and short. It will help you get started.Tweakheadz Home Studio – Tweakheadz is probably one of the most popular resources out there today. Many home studio musicians started here.Producer’s Manual – I love this book.The Studio Rescue series on YouTube is great: Link
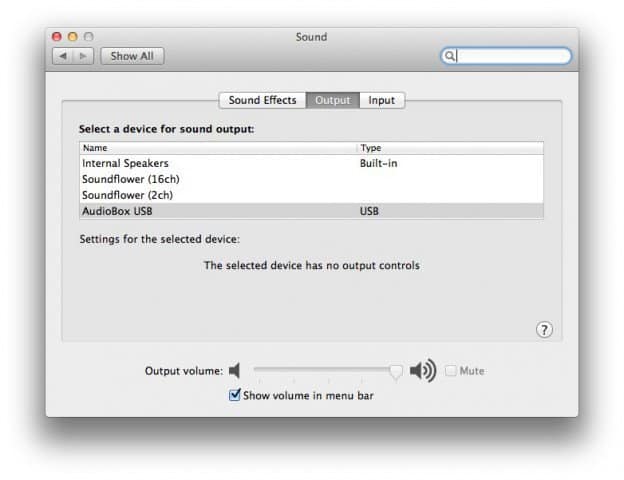
Plugging Things In Once you have kind of figured out where the desk and everything will go, it’s time to start setting things up. Your audio interface will plug directly into your computer via USB or Firewire, depending on your interface. The audio interface then plugs into your speakers with regular balanced cables similar to the ones you use to plug in a guitar. You will probably want a few of these cables. Two is minimal: one for left, and another for right (but this also depends on your studio monitors. Some lower-cost models come with their own cables). You may want a few more cables, because if you’re recording a guitar (1 cable) or synth (2 cables), you will need to plug those in at some point as well. You will need to set up your computer so that audio comes from the interface, and not the built-in speakers. On a Mac, that’s through: Apple Menu > Sound > Output > (Audio Interface. In my case AudioBox)
From here on out, if you are trying to turn the volume up and down on your computer, you will do so from the main volume control on your audio interface. If you’re on a PC, follow the manufacturer’s instructions to set up the audio. You should now be able to hear the computer’s audio out of your studio monitors. Get used to this, because what I want you to do next is listen to lots of your favorite music. All the time. Listen to it through those monitors and learn what things sound like. Just in case you’re wondering, we’re nowhere near done with your studio setup. Your speakers should be somewhere comfortable. If possible, put them on the monitor stands you may have bought if you had the budget (more on those in part 2). If you bought the isolation pads for the monitors, just place one of those underneath each. The important thing here is that they are at ear level to where you will sit when mixing and making your music. Make sure the cone is lined up with your ear. The other thing you want to do is make sure that your head forms a perfect triangle with the speakers. This is also a bit difficult, because you may not have the space to set everything up just the way you’d like. Do what you can, but get this as close to perfect as you can. Use a tape measure. The two speakers should be an equal distance from the center of your head, and they should be that same distance apart from each other. Again, your head and the speakers should form a perfect equilateral triangle. Get used to listening to music here. Keep listening to stuff you like. Preferably CDs because they have a less compressed sound and less artifacts than MP3s or other such formats.
Image Credit: SageAudio For now At this point, you should be able to install any software you have and start playing around with its basic functionality. You can make some music if you want, but that’s entirely up to you. Next week we will go over connecting the instruments and setting up the rest of your studio, such as acoustic foam and bass traps (if you bought this stuff). For now, just kind of learn how things work in your DAW of choice. We will start setting up the rest of the studio next week. After that we can start getting down to the fun stuff — making music! If you have any questions about setting up a home studio, please leave a comment or shoot me an email. Is there anything I can buy that will give me musical talent? Because I could really use one of those… I know you’re kidding with that last part, but all I can really say is listen to A LOT of music and draw some inspiration from there. I’ve found that doing covers of songs I like really helps, because it teaches me a lot about arrangement and composition. The learning parts by ear helps you, because it allows you to turn those musical ideas in your head into sounds. :D Comment Name * Email *
Δ Save my name and email and send me emails as new comments are made to this post.

![]()
