Since we last covered this feature in Microsoft Word 2010, significant improvements make Track Changes even more powerful. With the availability of Office Online, users can perform real-time collaboration on a document, which is one of the exciting new features we look at in this article.
Enable and Use Track Changes in Word 2016
Step 1: Starting Content
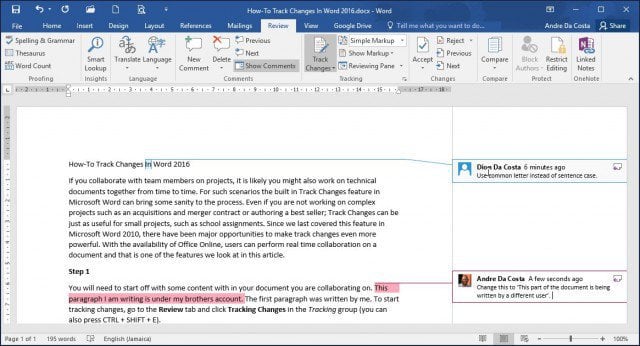
You will need to start with some content within the document you are collaborating on. A different user is writing this part of the document. I wrote the first paragraph.
Step 2: Enable Track Changes
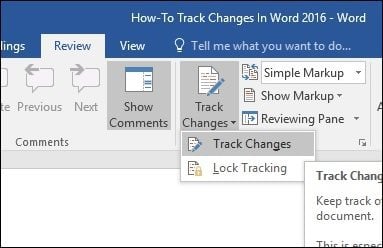
To start tracking changes, go to the Review tab and click Track Changes in the Tracking group (you can also press CTRL + SHIFT + E.)
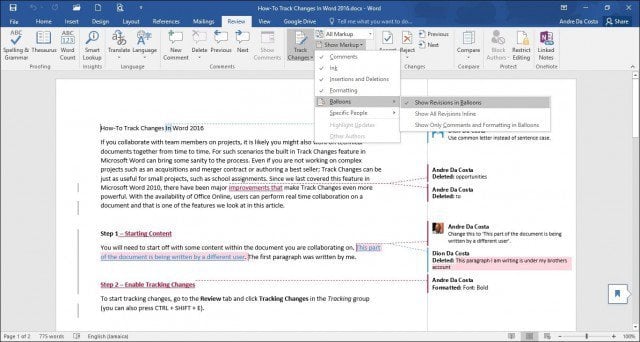
When Track Changes is enabled, you will see a balloon for each author on the screen’s right-hand side.
Step 3: Editing
Track Changes in Word uses color coordination to avoid confusion. The first author is blue, and the second is red. When additional authors make edits, they will also be assigned a unique color.
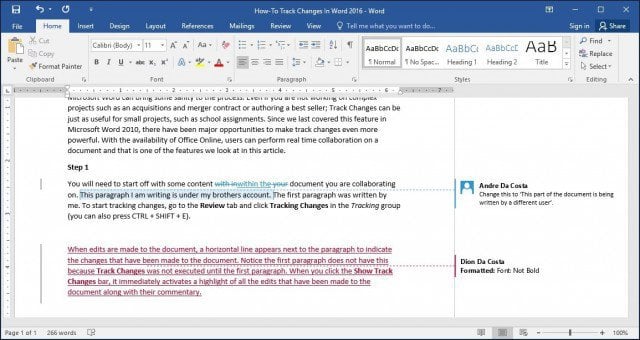
When edits are made to the document, a vertical line appears next to the paragraph to indicate the changes that have been made to the document. Notice the first paragraph does not have this because Track Changes was not enabled until further into the document. When you click the Show Track Changes bar, it immediately activates a highlight of all the edits made to the document and their commentary. If you keep it enabled and make edits, you will see the changes in real-time as you type and delete.
Step 4: Comments, Balloons & Additional Editing Tools
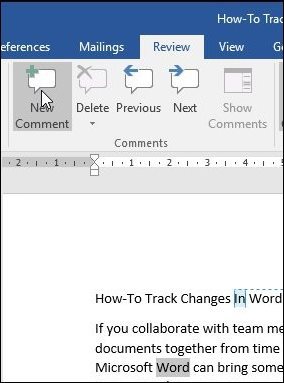
If you want to add a comment on a word or paragraph, highlight it, select the Review tab and click New Comment in the Comments group. Your comments will then appear on the right side of the document when the document is finalized; you can turn them off.
One of the things you’ll notice when you apply special formattings such as Bold, Italic, or Underline, a comment is automatically added to the track changes called Formatted.
You can also customize how you want balloons to appear on the document. For instance, if you want to see all the revisions added to the document by each author, click the Review tab > Show Markup menu > Balloons > Show revisions in balloons.
Revisions
The Reviewing Pane (Review > Reviewing pane) lets you review all edits by each author, which you can view vertically or horizontally on the screen. You can click a word or paragraph in the Revisions pane, and it will automatically navigate to that part of the document.
Step 5: Accept or Reject Changes made to document
If you agree with the changes that have been made to the document, you can Accept or Reject them. Click the Show Track Changes bar to highlight changes made by the other author, then go to the Review tab, click the Accept button to confirm.
You’ll now notice the changes are applied immediately.
Step 6: Compare Or Combine Documents
Another handy feature authors can take advantage of is the ability to version track a document. For instance, if two authors fork the same documents into two copies and continue working on them separately, they can later compare the two versions and combine them. As long as they are similar in structure, you can combine them to create a final document. To compare and combine changes, select the Review tab, click Compare, select the original document in the field box, select the revised version, and then click OK.
Microsoft Word will then present a three-pane view of the document showing the main screen as the final document with combined content and the original and alternate copies in a mini window pane. When you scroll through, you can compare the changes. This is preferably done on a screen with enough screen resolution.
When you are ready to combine the documents into a final copy, go back to the Review tab, click Compare, then click Combine, select the original document in the field box, select the revised version, and then click OK.
You will then see the combined document along with the changes made by other authors in another color.
Integration with Office Online
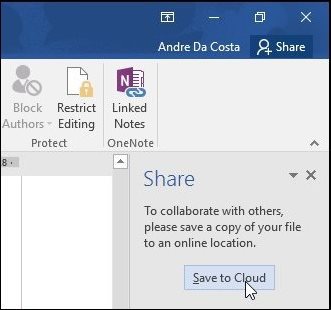
One of the killer features of Google Apps has been its real-time collaboration tools. Microsoft has finally caught up thanks to its Office Online suite, which features a web-based version of Word. A new feature in Word 2016 is sharing and viewing who is working on your document. To do that, click the Share button and save the document to your OneDrive folder.
The Share pane will then reveal additional options, with the ability to invite persons to edit the document with different restrictions. You will also notice the Block Authors and Restrict options are now enabled within the Protect group. If you use Microsoft 365 (formerly O365) in an enterprise setting, you can invite authors to collaborate.
For this article, I will use the Get a sharing link to email to additional authors I would like to collaborate with on the document.
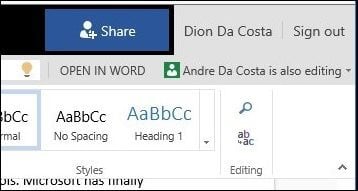
When you or the other author load Word Online and make changes, other persons collaborating on the document will be notified in real-time.
Here you can see saved edits made by the other author are color-coded in a blue highlight.
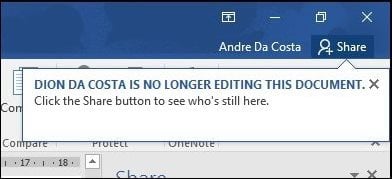
When an author is no longer editing the document, you will be notified within Word 2016.
As you can see, Track Changes is even more powerful with its real-time collaboration features. Whether you are working on projects big or small, Word 2016 can make it easy to keep everyone on the same page. Color coordination, sharing, real-time editing, and cloud integration with OneDrive add up to a compelling experience. Word 2003 was the only version that worked perfectly for me every time. How can I set Word 2013 (and eventually 2016 when I get it) to just do those simple little functions? Show Markup: Uncheck comments and formatting. Advanced Options: Make sure comments and formatting are still unchecked and change “Balloons in all Mark Up” box to “Nothing.” Tracking: Change “Deletions” to “Hidden.” [Which is the biggest secret; you can make your own notes, if necessary, directly to the text.] Make sure whoever receives your work has it set up that way on his/her end, too, so you’re not working at cross-purposes. Nothing deleted is gone for good until someone says Accept This Change, or Accept All Changes in Document. No, no one from Word has so far shown any interest in making TCs work for editors. Good luck. Please, how do I just get red and blue color (back and forth, back and forth), hidden deletions, and no messing with all those other functions? It worked perfectly in 2003 (for me, at least). There ought to be options for all the settings, not having to work around ALL the settings ALL the time. Some people want balloons, some don’t. Some want multiple author colors, some don’t. Some want Google-visible instant changes, some don’t. Some want date-specific changes, some don’t. Fix it so the user can pick and choose. If an option appears on the menu at all, it must be available, but if it’s gray, I can’t invoke it. So where in all the various places to look to specify preferences can I tell MSW that I want to use those options? Can I turn this feature on somehow? In the ribbon, I click “Track changes, and then click “Track changes again in the tiny menu that pops up. Next, in the Track changes section of the ribbon, which also contains things like “All markup” (which is what I leave selected) and “Show markup”, I click on the teensy arrow (Is it an arrow? Too small to tell.) that is in the lower right-hand corner, opposite “Tracking.” This brings up a larger “Track changes options” box. In that box, clicking on “Advanced options” brings you to a box where you can choose colors for the changes you make. I normally only deal with the ones on the top right for inserting and for striking out deletions, leaving them in red, unless some company I edit for has allowed other people to use that color already(grr). You can click on the little down arrows and select a different color if desired. Debra: Would the following help, or are you much more advanced than me and complaining about something I have fortunately not yet come up against? It may be that track changes has not really turned itself off and there is a toggle that will bring it back: The one feature I like in Word 2016 is the vertical lines that appear to the left of text that has been edited in some way. If they are black, you can see all the changes you have made–deleted items turned red and struck out in red. But if you click on one of those vertical lines, all such lines turn red and you will see the text in the form it will take without any changes being shown. I often switch back and forth between black lines and red because with too many corrections shown, things can get confusing. I have never had a course in using any version of Word, so have had to discover things “by guess and by gorry,” as my grandmother used to say, so there may be better ways. I welcome any and all information that makes life with Word easier. Comment Name * Email *
Δ Save my name and email and send me emails as new comments are made to this post.


![]()
