Thanks, Broken Netbook Captive! Hello Netbook Captive! Lucky for you I have just the fix for your particular issue! Fortunately you can use a groovy little open-source app in conjunction with a USB Flash Drive to crack into any Windows XP, Vista, or Windows 7 computer when you lose or forget your password. Just follow the steps below and you should be up and running in no time!
The Fine Print:
The process I’m about to review will completely clear the password on the username/machine you use it on. You will not be able to recover the password if you do not remember what it is. The process will create a new password like you normally would after booting back up and as a result, if you’ve encrypted anything on the system using the Windows EFS encryption, you will lose access to this data… Sorry..This fix requires access to the BIOS. It also may not work on older computers that do not allow the bios to boot from USB. You’ll need access to a computer with the internet and cmd prompt in order to set up the USB Drive properly. Please use this information responsibly, using it to access a computer that does not belong to you is probably illegal and not groovy!
How To Reset A Lost Or Forgotten Windows Password
Step 1 – Download & Extract
Download Offline NT Password & Registry Editor. Once the download completes Right-Click the .zip file and Select Extract All. This will decompress the contents, which there should just be a single .iso file inside.
Step 2 – Mount or Extract the .ISO
Download and Install a virtual drive software like Virtual Clone Drive or Magic ISO to mount the extracted cd100627.iso. (Click here for instructions on mounting .iso files to a virtual drive in Windows 7, Vista, or XP) Alternatively if you have a file compression manager installed that can Extract .iso files you can also just do that.
Step 3
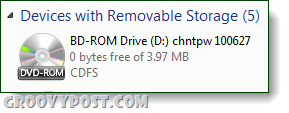
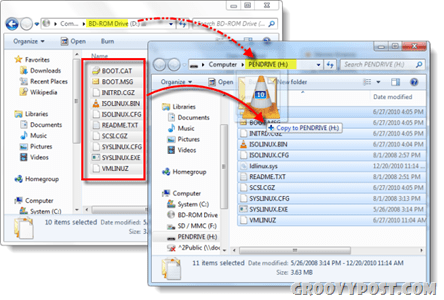
Browse the virtual drive and copy the contents to your USB drive.
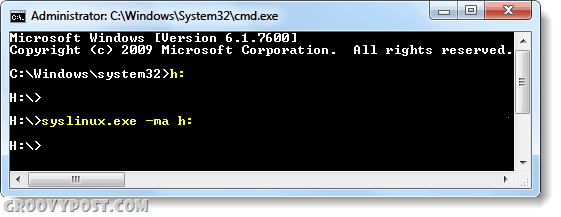
Step 4 – Identity Your Thumb Drive & Launch CMD
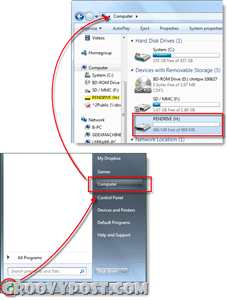
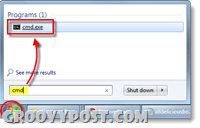
Click the Start Menu and Select Computer, now note which drive letter is assigned to your USB Stick. Next, go back to the Start Menu, Type cmd in the search box and Press Enter.
Step 5 – Make the USB Drive bootable
We need to make your computer recognize the USB drive during bootup. To do this you’ll need to enter a few lines in the cmd window that you just opened. First switch to your USB Drive’s directory as noted in Step 4. Just change the letter in both lines to match your letter. Then type in the next command, again change the letter to match your drive:
Half Done! Plug In Your USB To The Computer In Need
Now we’re done setting up the USB stick and we have all that we need to reset the password on the Windows computer in question. Go ahead and plug in your now ready USB Drive to the computer that you need to reset the password on. The rest of this How To will be done on the password locked computer.
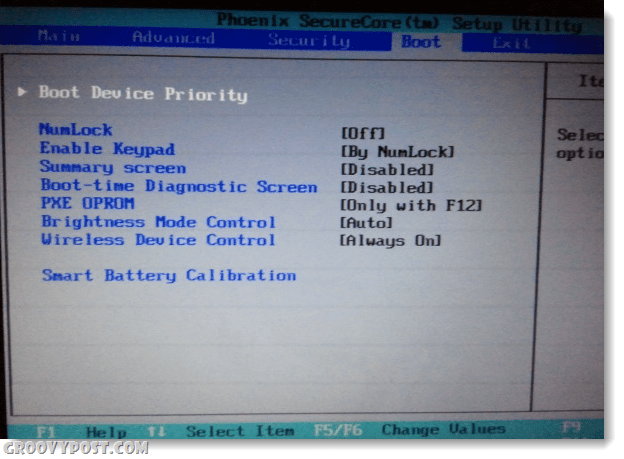
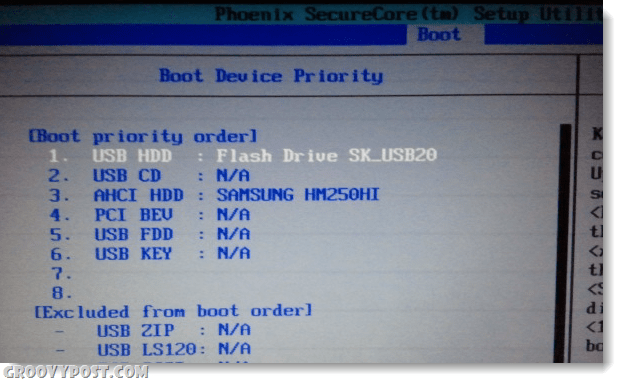
Step 6 – Setup Bios Boot device order
Restart the computer and hold down F2 or whatever the setup key is shown as during the initial boot screen. This should bring up the bios. In the bios look for Boot order, or Boot Device Priority, it will vary what it is called depending on the manufacturer. If you have trouble navigating the bios, controls are usually shown at the bottom of the screen. It’s keyboard only, you can’t use your mouse here.
Under boot priority set our USB Flash Drive to #1, or the highest available slot on the list. Once you’ve got it, save changes and reboot.
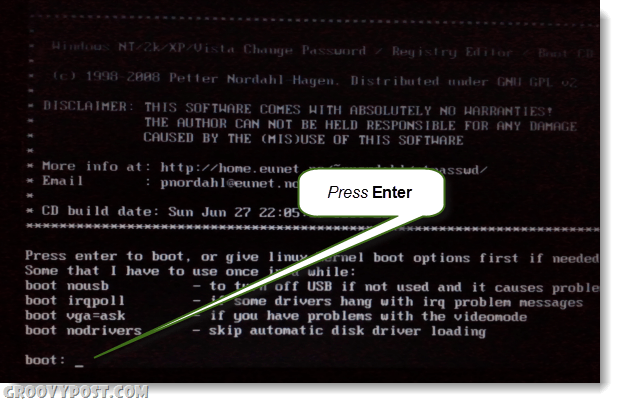
Step 7 – Boot from the USB
If you set up the bios correctly your computer should automatically boot from the USB flash drive. When it loads to the screen shown below, just Press Enter to launch the application.
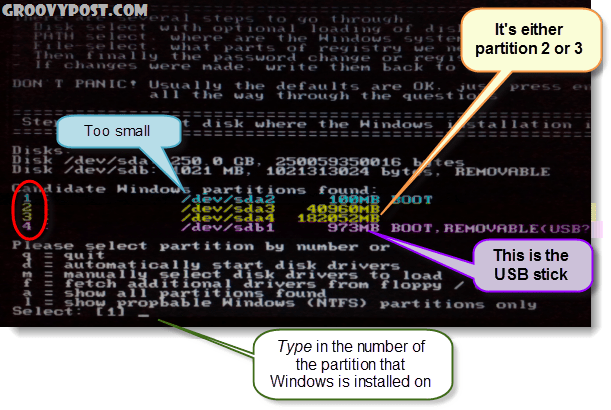
Step 8 – Select Your Windows Hard Drive Partition
The program will scan your hard drive for partitions that may have Windows installed. In the example below it found 4 different possibilities. Type in the corresponding number for the partition that contains your Windows installation, and then Press Enter.* *Don’t worry, if you get it wrong you won’t ruin anything, you can come back to this screen by using the quit options that appear and try a different partition.
Step 9 – Did you guess the right partition?
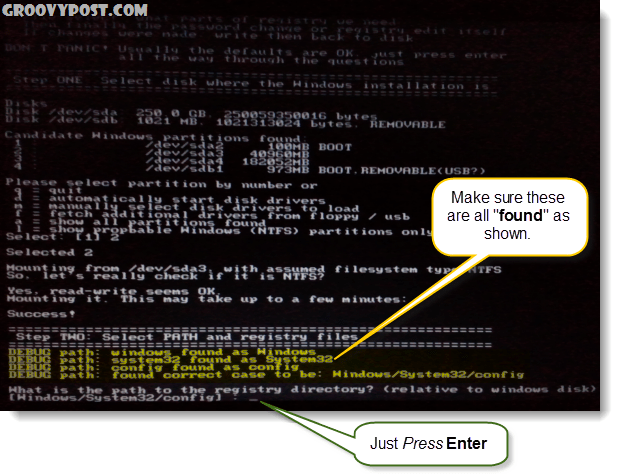
If you guessed the correct partition, the next few lines will read: Does it look right? Yes? Good job, Press Enter and lets finish up. DEBUG path: system32 found as system32 DEBUG path: config found as config DEBUG path: found correct case to be: Windows/System/32/config If it looks wrong, Press Enter but on the next screen Type in q to go back and select a different partition.
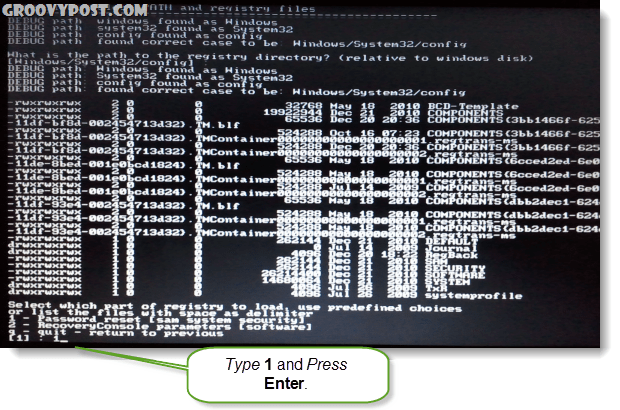
Step 10 – Select Password reset [sam system security]
Type in 1 and Press Enter.
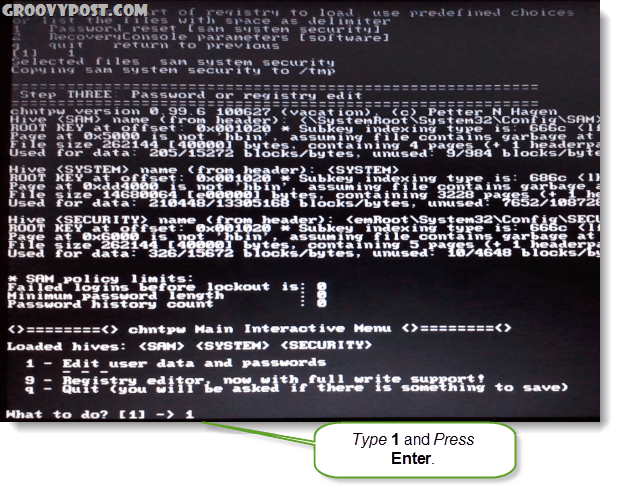
Step 11 – Edit user data and passwords
Type in 1 and Press Enter.
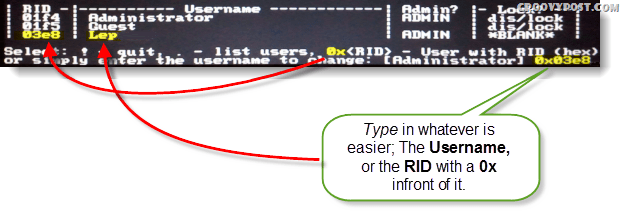
Step 12 – Select a Username to reset the password for
On this part, you’ll see an RID and the corresponding Username. Depending on what is easier, you can Type in either. If you choose to type in the RID number, you must add a 0x before the number. For example I entered 0x03e8 for the RID 03e8. In this case, typing in the Username Lep would have worked for me too.
Step 13 – Clear user password
Type in 1 and Press Enter.
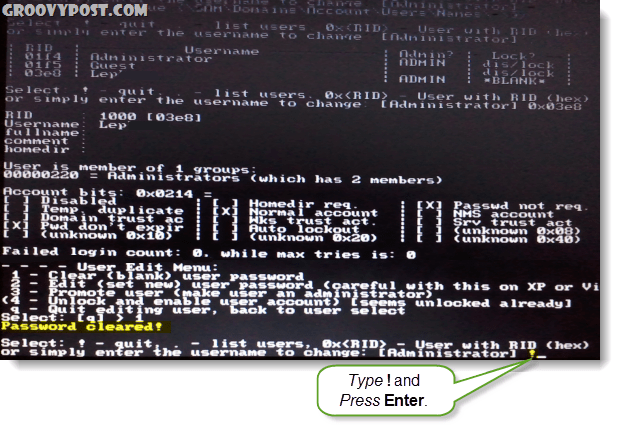
Step 14 – Password cleared!
You should see a short line appear that says Password cleared! Now we can save and quit, Type in ! and Press Enter. Yes, literally type an exclamation point.
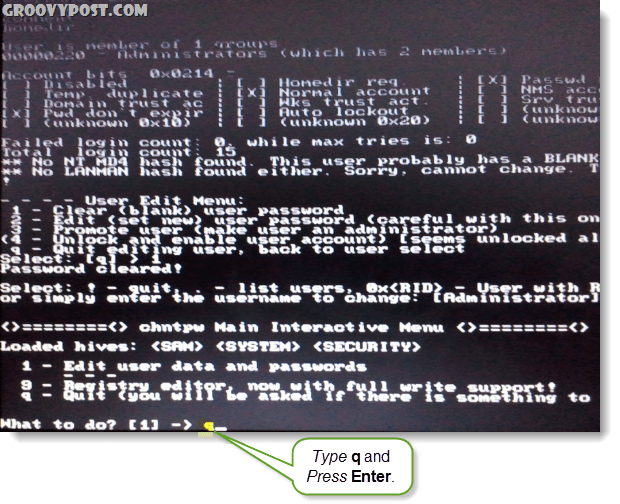
Step 15 – Quit and Save
Type in Q and Press Enter.
Step 16 – Save changes, write files back.
Type in Y and Press Enter.
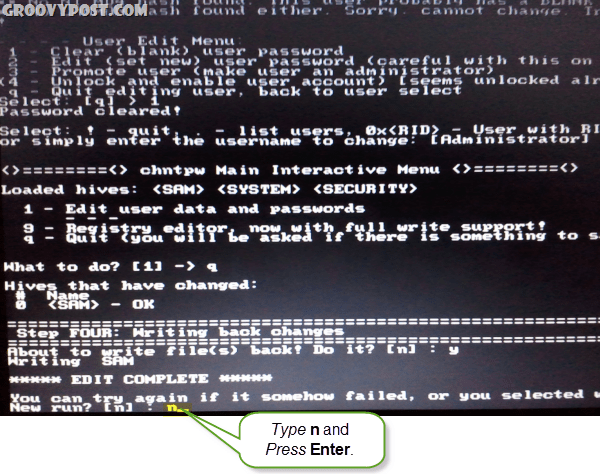
Step 17 – Decline a new run, if it worked
If you saw a line that said EDIT COMPLETE , then it worked. Type in N and Press Enter. If by chance it didn’t save successfully, Type in Y and try again.
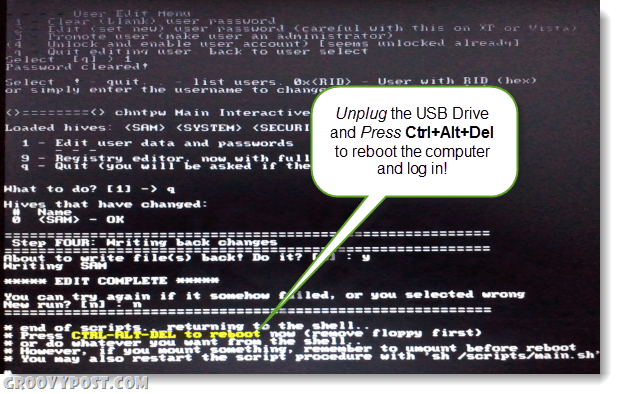
Step 18 – Unplug the the USB Drive and Reboot
Now you should be able to reboot, just be sure to Unplug the USB Flash Drive first! Press Ctrl + Alt + Del to restart the computer. If you want, you can go back in and change the bios settings, but they won’t prevent windows from loading as long as the USB is unplugged.
Done!
Now the computer should boot right up! The account that you were trying to log into should now have a blank password, and depending on the systems startup settings it might just load straight into Windows without requiring a login. Groovy eh? If you have any questions, drop a comment below or join the groovy discussion in the free community board! Really glad we helped you out! Welcome to groovyPost! In most Asus EEE’s I’ve worked with, I noticed that there is a separate boot menu that overrides whatever the bios says. This can be found by holding down/spamming the ESC button while the computer is booting up. From within this separate boot menu you should be able to set USB to first priority. I followed the instructions and it ended up disabling the account that i was trying to open as i could not remember the password. It also did not ask me to setup a password in the above instructions, so i am assuming that the password section is left blank. Now i am trying with the user name “Administrator” and no password it says that the account has been disabled. i dont know where i went wrong. Please help me. Comment Name * Email *
Δ Save my name and email and send me emails as new comments are made to this post.


![]()
